Editing videos is often the biggest hurdle stopping potential creators from making the jump into producing content for YouTube.
While it’s true that some of the more complex editors have a steeper learning curve, there are several great in-browser video editing options that will have you posting videos to YouTube or your social platform of choice in no time at all!
We scoured the internet and tested all the editors we could find, pulling together a list of the very best for you to explore. Don’t mention it!
These in-browser editor options are all very user-friendly and many have deeper functions you can explore as you grow more confident to create even more high-level videos for your audience to enjoy.
Jump to a specific product below
Storyboard Style (beginner)
On to the list…
Timeline Style Editors
#1 WeVideo
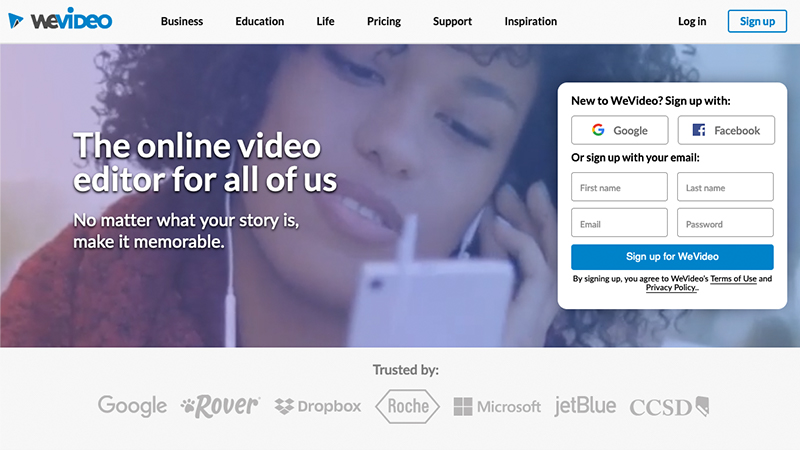
Set up in the style of a professional video editor, WeVideo gives you amazing control over all aspects of your edit. WeVideo represents the best of the in-browser programs compared to professional editing programs like Adobe Premiere Pro
One of the most impressive things about this editor is that they are able to make it so intuitive and easy to understand but still give you such specific control.
Some of the features available are simply mind-blowing, so if you’re looking to add some real polish to your projects, WeVideo could be the editor for you!
Ease of use:
Though it’s not as simple as a drag and drop system like other video creators on this list, WeVideo is still very easy to navigate. The interface consists of three key sections, a media browser at the top next to the video preview window and a timeline running across the bottom of the screen.
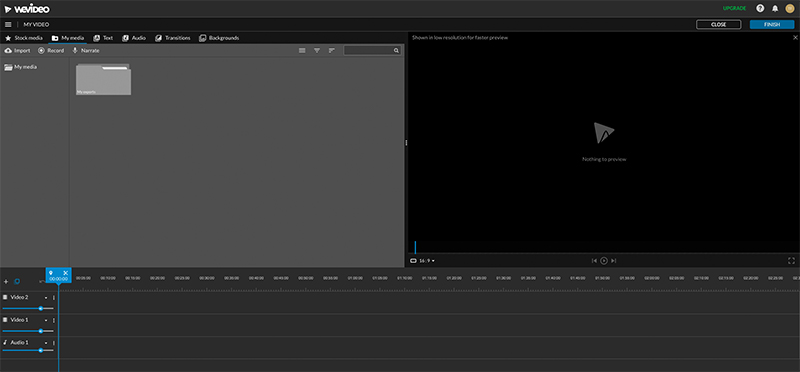
To get started, you’re able to upload your own media, video clips, audio and images or browse the good selection of stock media available in the paid plans.
There’s also a great recording function that will let you record via your webcam directly into the editor, or record your screen and the actions you perform there.
All your assets appear in the media browser and whether recorded or imported are easy to manage by creating folders. Once you’ve got all your media sorted, you simply drag clips down onto the timeline where you can then easily trim clip lengths, change audio levels and apply effects.
It’s possible to add multiple videos and audio layers all of which can be renamed, so you can easily manage the different types of footage on each layer in the timeline.
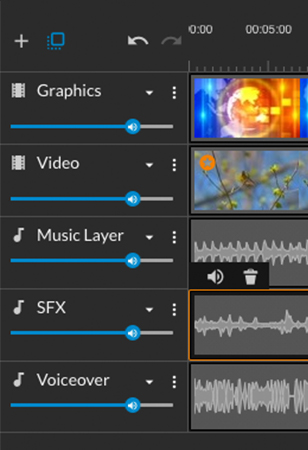
This also means the audio can be stacked so music tracks can accompany sound effects or voiceover with the audio levels of each track easily visually managed on each clip.
Support for WeVideo comes in the form of a great video academy that will take you from beginner to advanced levels and a well-organized series of step-by-step articles that address various issues that might arise with supporting pictures.
If these two resources don’t answer your questions you can also contact the team through their inquiry form.
- Amazing video Academy
- Simple step by step articles
- Email enquiry form
- Great YouTube channel with lots of other resources
Features:
The features available on WeVideo are seriously impressive. The quality of the timeline alone makes it a cut above other online editing platforms. The level of control it gives you over your edit means you can create videos with some serious polish.
But a step beyond that, the color keying function is an amazing addition to an online video creator. If you have access to a blue or green screen, you can remove the background with just the click of a mouse.

This is an extremely useful feature for creators wanting to have their image feature over screen recordings or game clips without a background distracting from the action.
It’s even possible to speed ramp your footage, a technique favored by many top YouTubers that speeds up and slows down video for dramatic effect. A feature they manage to make very easy with the simple use of sliders.
Other great features include but are not limited to…
- Multiple video formats
- Direct export to social media
- GIF creator
- Voiceover
- Motion tiles and templates
- Set brand elements
- Create your own templates
Publishing:
Once you have your video looking the way you want it to, the next step is to navigate to the top right of the screen where you click finish. A simple export screen loads which give you the option to download the video in HD or 4k depending on your subscription.
There’s also the option to download the audio-only or create a GIF. And the ability to publish directly to a number of linked social accounts including YouTube and Vimeo, with an added extra that you can preset the default thumbnail from three available options.
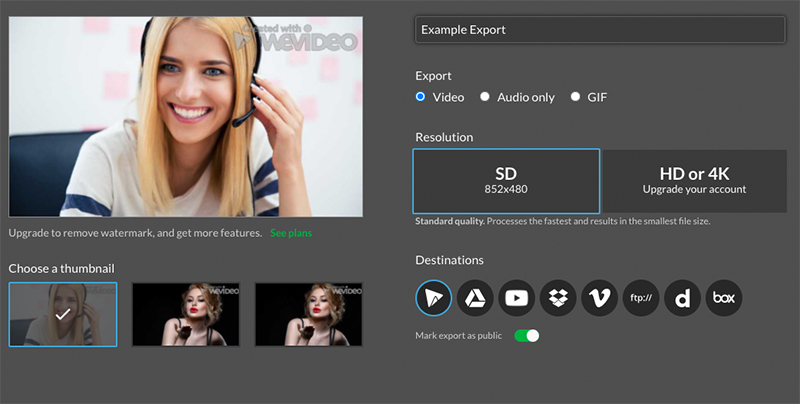
After clicking export, the render and download process begins, with a handy timer that lets you know how long the process will take. One final click to download or share to other connected social platforms like Facebook and Twitter and the video is ready to go.
Pricing:
- Free – Free access to try the tool out, can only export a low res watermarked video
- $4.99/mo USD – Power package lets you export at 720p with no watermark and gives you access to templates and greenscreen function
- $7.99/mo USD – Unlimited package gives you full HD exporting, unlimited storage and extra features.
- $17.99/mo USD – Professional package lets you export in 4k, gives you unlimited stock footage access and lets you create a brand kit among other features.
All prices are monthly based on an annual subscription. Month-to-month prices are also available.
Room for improvement
We are extremely impressed with WeVideo and in terms of the functionality and can find very little room for improvement. However, the background and overlays templates could be better and more abundant.
The stock library, though it seems quite extensive relies on you searching for footage, with no way to browse categories for inspiration, so a better-organized library would be of benefit. That being said, this editor is really best suited for creators who are bringing their own footage to edit.
Also, If you have a subscription to Envato elements, for example, you’ll have all the stock footage, music, sound effects, and templates you could need. The strength of WeVideo is in the editor itself.
Overall:
WeVideo delivers a top-quality video editor that does all the technical things right. Almost everything you would expect from professional editing software is there but with the impressive feat of it being completely in-browser, no software to install and update!
Footage upload is fast and final film download is equally speedy. Unless you need 4k exports, the $7.99 unlimited price point delivers everything you should need at a cost much less than some other far inferior editing platforms.
In short, we can’t recommend it highly enough!
#2 Kapwing
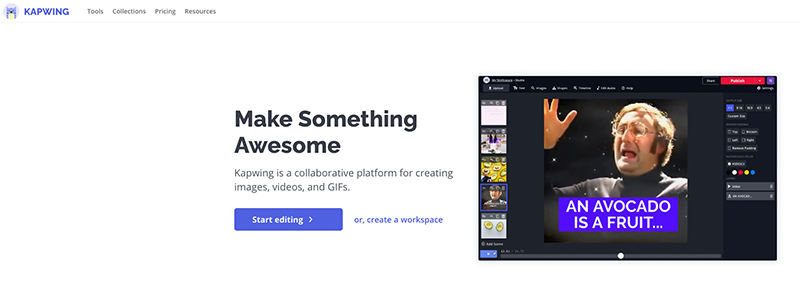
Kapwing is unique in this list as you can get access to a very good online editor completely free! There are paid plans that are worth considering for various reasons we’ll get into but it’s possible to create and upload great videos for free without a watermark. Not a bad start!
One thing to understand about Kawping is that there’s no big stock video library of hundreds of video templates to choose from to get you started, it’s basically just the editor. But don’t let that put you off! Kapwing is actually one of the best editors on this list.
By focussing on creating a great editor, without all the extra integration, they’ve managed to create a tool that runs super-fast and is very easy to use and navigate.
Ease of use:
The layout of Kapwing is excellent. The timeline stretches the bottom of the screen and is clear and easy to read, even when full of different assets.
The media menu on the left houses all your uploaded clips, music, and sound effects, but also has a handy scene tab for sectioning out longer videos and a layers tab that shows the stacking order of the assets in that scene.
This can be slightly confusing at first as the hierarchy of assets in the timeline doesn’t translate to the stacking order they will show in the playback window, that order is displayed in the layers panel.
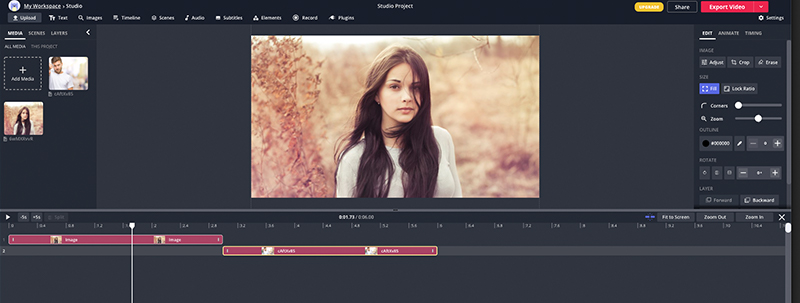
The playback window takes a good bit of space in the middle with a context properties tab on the right that changes options depending on what asset you have selected in the timeline.
As we said before, the editor is very simple to navigate and use. In the timeline, clips are shown with their audio attached. When adjusting the audio volume this reflects in real-time on the size of the audio track, handy for quickly visually checking the levels.
The effects and transitions are simple but easy to access from the properties panel on the right of the screen. For clips, simple color adjustments and a small array of filters are available to punch up the look of your clips.

The included elements are a small number of shapes, an image search function, and the ability to record a screencast, your own webcam, and record audio at once.
The support available on Kapwing isn’t extensive. There is a fairly well-stocked help center that may answer your questions. If not, the resources library and Kapwing YouTube channel have plenty of articles and tutorials to help you get started.
Features:
One of the biggest virtues of Kapwing is its no-frills workspace and lack of potentially unnecessary addons. However, that’s not to say that they don’t have some useful and interesting extras at your disposal.
Where the free version only lets you export videos up to 7 minutes long, the pro lets you export videos up to an hour. There are faster exporting times and an ability to upload custom fonts and larger video files too.

The subtitle editor is one of the best we’ve seen. A really intuitive slider-controlled layout lets you place subtitles easily over the video exactly where you need them.
You’re also able to export the subtitle file as a .srt so you could load them directly into YouTube if you don’t want subtitles ‘baked in’ to your video.
A good remove background tool lets you use green and bluescreen video in your projects and a very clever meme generator is perfect for punching up your social media presence.
Kapwing’s other great features include…
- Video converter
- Collage Maker
- GIF Maker
- MP3 Editor
- Stop Motion Maker
- Translate video tool
Publishing:
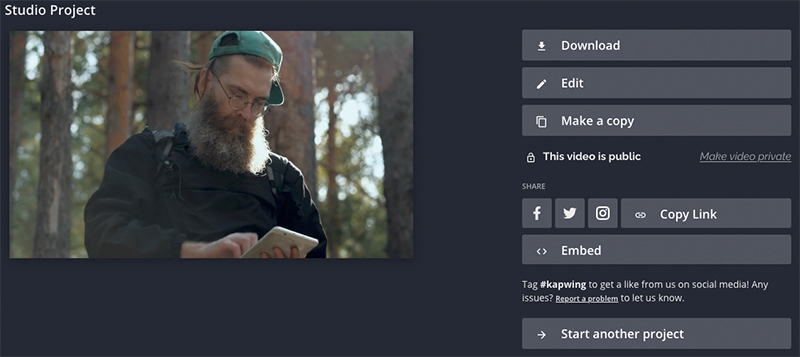
Once you’ve completed your edit you simply hit export and are taken to the render window. Your video should render very quickly before giving you the option to download or share the project to one of Facebook, Twitter, or Instagram
Pricing:
- Free – A great free offering, not to be overlooked!
- $17/mo USD (year contract) – The Pro package lets you export up to hour long videos in full HD
- $20/mo USD – The pro package on a month to month subscription
Room for improvement:
While it’s a great platform, a couple of little issues jumped out. A folder structure for your media would be helpful. Currently, everything is just lumped in together which can make your media browser very cluttered in larger projects.
The layer stacking order not being reflected in the timeline is a little confusing and we’re not exactly sure why one doesn’t inform the other. Assets can also only be moved up and down in the stacking order using the layer buttons in the context properties tab which seems counterintuitive.
Overall:
We are blown away by the quality of the platform at such a reasonable price. And the usability of the free version shouldn’t be overlooked. You can create great videos just by testing the product out for free. So stop reading and get editing!
#3 Moovly
Coming in at number 3 on the timeline editor list we have Moovly. With a dashboard similar to WeVideo, Moovly gives you amazing control over all aspects of your edit.
The editor allows you far greater control than the simpler drag and drop options, but still remains easy to navigate and create.
For anyone worried about approaching a more sophisticated editor, Moovly makes the jump comfortable with a great overview video and a 46-point walkthrough that takes you through all the various options available in a quick and easy-to-follow way.
Ease of use:
Despite having many more options available to you, Moovly manages to keep its interface easy to navigate.
When you have clicked to create a project, the editor opens in a new stand-alone browser window which helps to focus on the edit without other tabs distracting you.
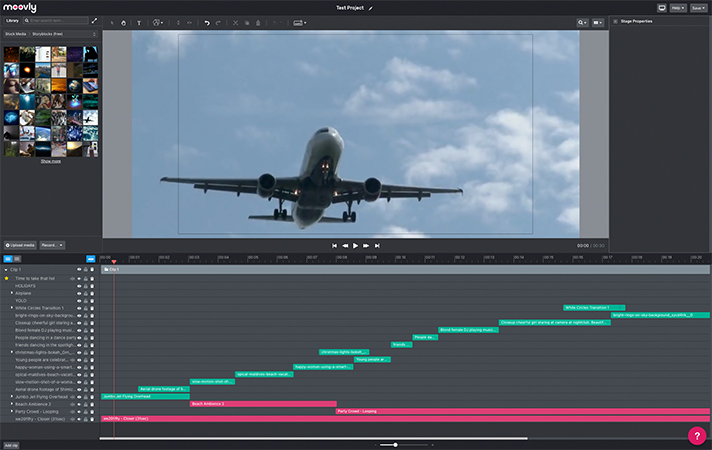
The timeline where you edit your clips stretches the width of the window at the bottom. Above that from left to right run the media browser, the playback window (which Moovly refers to as the stage), and then a properties window that updates customizable options based on your selection in the timeline.
You can begin by uploading video, audio, or images to your personal library. Moovly comes with free access to Storyblocks with over a million assets for you to use in your projects.
There’s also an integrated iStock button that gives you access to use their video and image library on a pay-per-clip basis.
There’s an interesting text-to-speech function with multiple different voices available if you’d like to include a voiceover but don’t want to record it yourself. As well as screen, webcam and microphone recording options. These clips are then saved in your personal library, ready for you to add to your project.
The timeline is where your project comes together and Moovly doesn’t disappoint with the number and variety of editing options it provides.
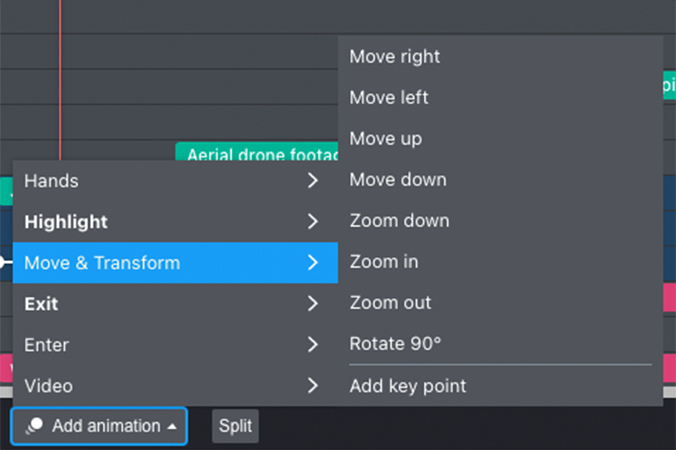
A click of the add animation button below the timeline reveals a host of transitions and effects you can apply to your layers. A handy split button also lets you cut the selected clip at the playhead, a quick and useful tool to speed up your edits.
Support using Moovly isn’t quite as extensive as some other platforms. They have the initial overview and walkthrough, but the next stop is a more generic search term-based help center.
Their YouTube channel has some useful resources, however, the only solution to an insurmountable problem is to raise a ticket with their help team and wait for a reply.
Features:
Moovly has a big list of customizable features for you to add some flair and your own style to your videos. A variety of animation options used creatively can elevate your videos to a professional level.

The library functions in Moovly are particularly impressive. Not only is there a big selection of graphic and stock media options, but the expanded library view also allows you to focus on navigating through the various options available and helpfully preview the clip or graphic you are viewing before inserting it into your timeline with one click.
A useful stage properties tab at the top of the Properties panel lets you set up your document for whatever purpose you need at the beginning of your project.
However unfortunately if you decide to change video formats mid edit, maybe intending a video for Instagram rather than YouTube, your video assets aren’t auto-resize for you, so a little tinkering will be needed.
Moovly’s great features include…
- A well-stocked content library
- Handy expanded library feature
- Integrated screen, webcam and voice recorder
- Clever text to speech option
- Nice collection of ready to use templates
- Big list of social and other integration options
Publishing:
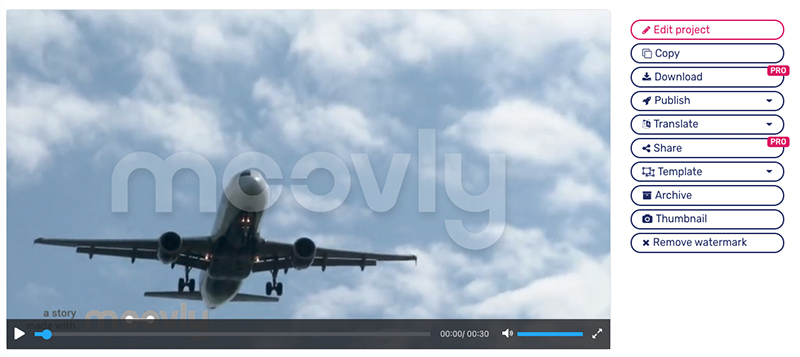
Once you’ve completed your edit you simply save your project and close the editor window down. Back in the main Moovly site, your project will be saved in the ‘My Projects’ folder of your account.
From here you can preview an HD render of your video, reopen the editor to make any amendments, and download or publish your project to any of the integrated platforms, including YouTube, Vimeo, Facebook, and Instagram.
Pricing:
- Free – Publish watermarked videos to social up to 30 seconds long.
- $24.92/mo USD – The Pro package lets you download or publish 25 HD videos per month.
- $49.92/mo USD – The Max subscription doubles the videos you can publish to 50 per month and activates many extra features like the text-to-speech and screen recording functions.
Room for improvement:
Whilst it’s a great addition to get users started, it would be helpful if the walkthrough would allow you to jump to the next point without having to perform the action it describes.
As it stands, if you need a quick reminder you need to cycle through the whole thing again or consult the help center.
Some actions take a while to implement and the interface can be a little buggy. Footage upload and placement on the timeline can also take quite a long time depending on the length and file size of the clip.
Overall:

Moovly is a great option for creators looking to start using an editor that gives them more complete control over their edits.
With the Storyblocks and iStock integration, it’s a particularly good option for creators who rely more heavily on using stock video and assets.
In the free trial version, creators have access to all the Pro and Max features to test out, so why not dive in and see what the platform can do for you.
#4 Veed
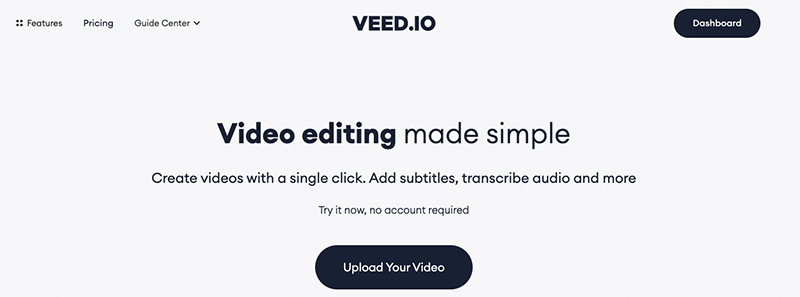
Like Kapwing, Veed is a stripped-back timeline editor without any of the template and stock frills that other editors on this list have. But again it’s the quality of the editor that has won it a spot.
The project window is extremely stripped back. The all-white interface has only a handful of menu options to deal with and the settings menu is always self-explanatory.
For this reason, Veed feels like the perfect bridge for creators looking to move from storyboard editors to timeline editors. The process looks and feels similar but ultimately delivers you the far greater control that all timeline editing offers.
Ease of use:

Once you open a new project, you’re prompted to upload some footage. A simple drag and drop and our footage uploaded extremely quickly. Very impressive!
With footage loaded into the timeline, which stretches the width of the browser window, we can begin to explore the stripped-back interface.
Seven different menu options are available down the left-hand side of the window, each of which has a small, easy-to-navigate settings menu that opens when you click it. A playback monitor and that’s it!
But that’s really all we need to start creating great videos. Once we click on the clip in our timeline we’re given all the options we would need. Some limited transform options, a way to set the volume, change the clip speed, or replace the clip with another from the library.
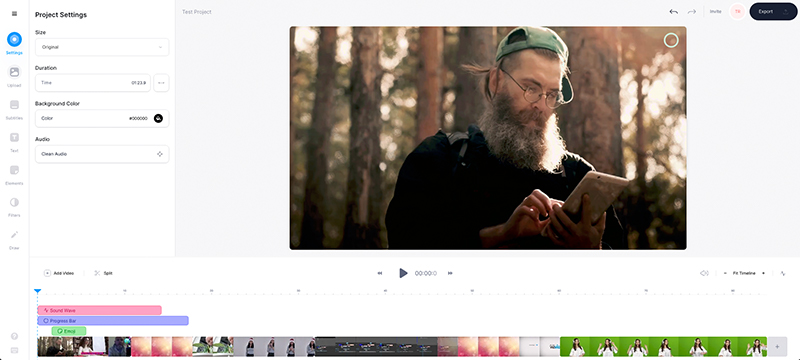
Some simple color correction options are also available alongside a small number of effect overlays. But those are all the tools you have to work on your clips.
There are limited elements features which include simple shapes that you either click and drag onto the monitor or simply click and let the editor place on the timeline at your playhead.
Support for Veed comes in the form of a very well-stocked YouTube channel with loads of different tips and tutorials on the various ways you can use the platform. If you don’t find an answer there we’d be surprised. Their blog is also well stocked with tips and tutorials. A chat function is available for those on the paid plans who need a bit of help.
Features:
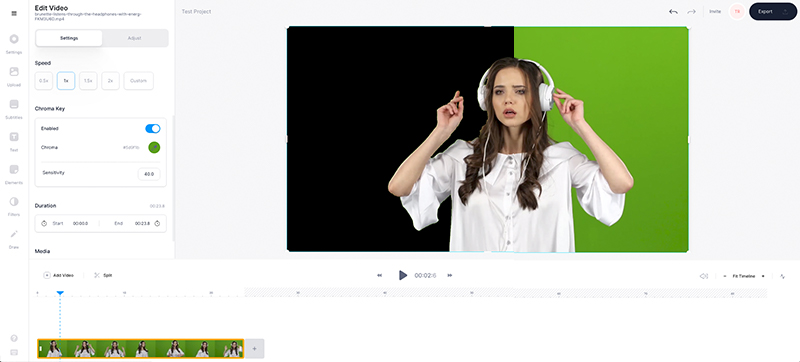
Veed’s biggest selling point is its stripped-back, straightforward workspace. We think this makes it the perfect platform for users moving from storyboard editors into the more complex world of timeline editors.
The simplicity of navigating the interface and quickly finding what you need is also particularly helpful as you can spend your energies concentrating on the edit rather than remembering where everything is.
The Chroma Key function (greenscreen remover) is impressive and also available for use in the free version which seems very generous!
It also has an excellent inbuilt auto subtitle feature which can save hours of work scrolling through and adding them manually.
Other features include…
- 4k exporting
- 100gb storage
- Subtitle translation
- Brand kit
- Custom fonts
- Custom watermarks
Publishing:
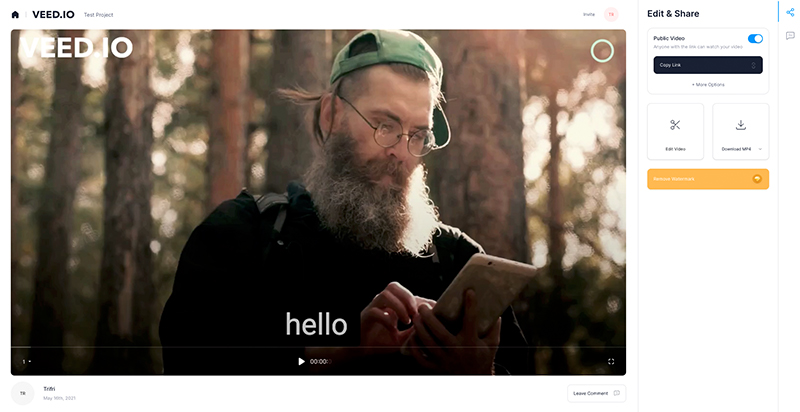
Once you’ve finished your edit, a quick click of the export button takes you to a rendered screen that prepares your video extremely quickly. You can then share the render using a link they provide with other people to comment and review.
Or simply download your HD or even 4K footage (depending on your plan) and upload to any social media channels you wish.
Pricing:
- Free – Export a watermarked video up to 10 minutes in length.
- £10/mo GBP – The Basic package lets you export up to 25 minute long videos in full HD
- £18/mo GBP – The Pro package will let you export up to 2 hour long videos in 4k!
These prices are monthly based on a year subscription. Month to month options are also available.
Room for improvement:
Though the editor is very impressive, one key thing that jumped out to us was the lack of any transitions or even fade in or out options for video or audio. Just a couple of simple additions would vastly improve an already impressive platform.
Also, there’s no storage area for your clips. Once uploaded they only exist on the timeline. While this definitely saves on space, it means you have less freedom to cut and change without having a solid idea of how you want your video structured in advance.
Overall:
A really great editor and the perfect halfway house for creators moving from storyboard editors to timeline editors. While it’s maybe not best suited to more experienced creators, it would definitely prove a good learning ground.
#5 Clipchamp
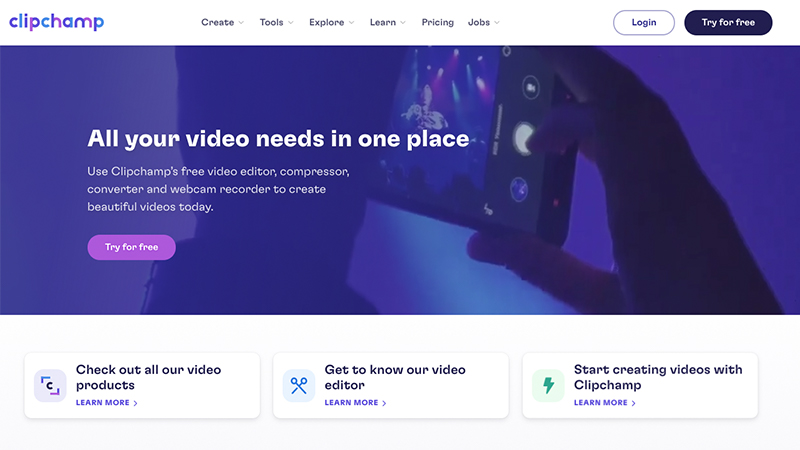
Clipchamp has maybe the most stylish interface of all the editors on this list. Sleek and well laid out the editor really has the feel of a professional product. But it’s not all style and no substance.
The editor is packed with a host of templates, tools, stock, and graphics to punch up your edits, and the effects and filters available when editing your clips is impressive.
It might prove to be a little overwhelming for beginners, but if you’re willing to spend a little time exploring how to use it, you’re bound to be impressed with the results.
Ease of use:
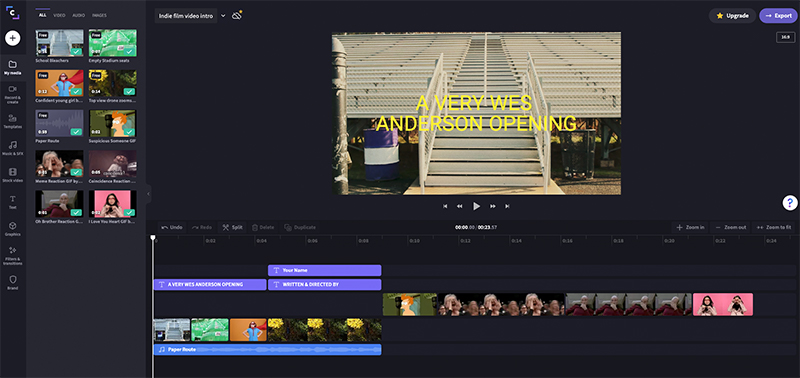
With all the options available with Clipchamp, it could have been easy for the interface to become cluttered. But the menu system is well structured, laid out the full height of the browser on the left are all the relevant sections.
The timeline looks great, all different types of assets are color-coded so you can easily identify them, and options like the split clip and undo are easily accessible at the top.
The playback window takes up the top half of the screen above the timeline with clip transform properties appearing above that when an item on the timeline is selected.
The upload function is the first stop on the top left and lets you import media from multiple different sources. It also handily gives you the option to record your webcam or screen from this pop-out menu. This gathers all your footage importing functions in one easy-to-access place.
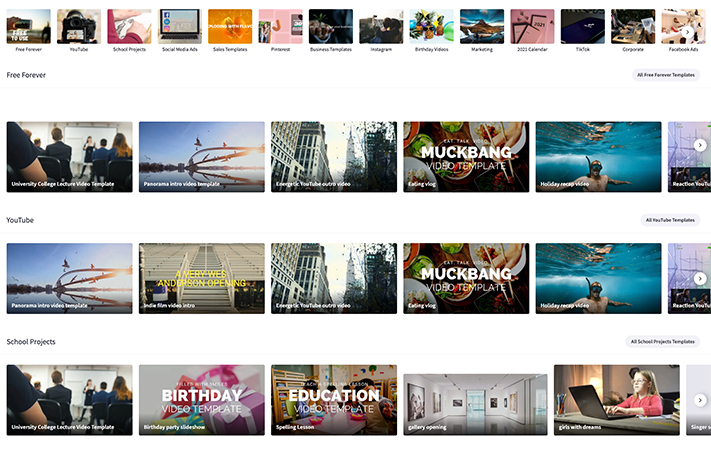
Templates are available in their own menu and as well as offering a lot of useful options, they are all tagged under a range of categories to help you pin down what you need. It’s also possible to keyword search the library.
The music, SFX, and stock video libraries are all split into categories too which helps when you’re searching for some inspiration. A well-stocked graphics section and click to apply filters and transitions round out the user focussed experience.
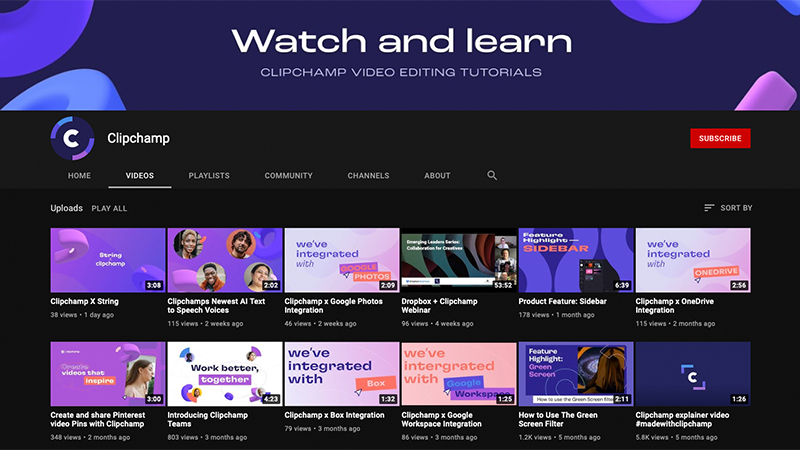
Support for Clipchamp comes in the form of a chat option, in which you can chat to one of their help team or search their articles for an answer to a question. There’s also an excellent YouTube channel that is completely packed with useful tips, tricks, and inspiration.
Features:
Clipchamp has a number of great features that we haven’t found anywhere else. In the import section, for example, you’re given the option to import directly from google drive and pictures, zoom, dropbox, and one drive. There’s also a really great feature that means you can import files from a phone using a browser link and custom pin.
We love a well-categorized stock library and Clipchamp’s doesn’t disappoint. They also have a great ‘free forever’ category in each of the stock video, music, and template libraries. Very helpful for creators trying the software out on the free plan.
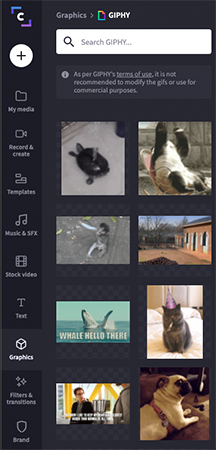
Another awesome addition is access to the GIPHY gif library via the graphics menu. This function would be really useful for creators wanting to use popular gifs and memes in their videos.
Clipchamp’s great features include…
- Webcam recording
- Screen recording
- Premium templates
- Custom branding
- Video compression
- Video converter
- Cloud media backup
- Downloadable desktop version
Publishing:
When you’re ready, the export button is found at the top right of the screen and will take you to a new page where your clip will render.
From there you can download your video directly to your computer, save it to a number of online file management systems including google drive and OneDrive. Or you can publish straight to a linked YouTube or Pinterest account.
Pricing:
- Free – Basic plan is free to use but limits you to 480p exports
- $6/mo – Creator plan, lots of available tools, 720p exports
- $27/mo – Business Platinum, access all tools and stock, full HD exports
All prices are monthly costs on a year subscription. Rolling month-to-month plans are also available.
Room for improvement:
We have very little negative to say about Clipchamp, all round it’s a great platform. However, if pressed, compared to others in this list, we felt the timeline is a little floaty, there doesn’t seem to be a snapping option we could find, which means it can sometimes be tricky to place and maneuver your clips.
The ‘my media’ folder could also use a better file management system. They split it into video audio and image sections, but it would be really helpful if you could create subfolders as the menu can quickly become overwhelming the more clips you add.
Another small gripe is that the render process can take quite a while when exporting. Not a killer but something to watch out for if you’re on a tight deadline!
Overall

Clipchamp is a great timeline editing option for creators of all stripes. The variety of stock, template, graphic, and gif options available means the platform could cater to just about anyone.
The $6 per month Creator plan is an absolute steal, though we wish there was a cheaper option that allowed full HD exports. Still, a great entry and definitely worth checking out!
Storyboard Style Editors
#1 InVideo
In their own words, InVideo helps you – transform your content into great videos – and it really does!
In a well-rounded, easy-to-navigate interface that lets you create great videos in a simple scene-by-scene window, or if you’re feeling more adventurous it even lets you dig down a little deeper.
InVideo is a very robust system that gives you some great options to get creative whilst still managing to be easy enough to quickly log on and use, no training necessary.
Ease of use:
As with many editors in the storyboard style editor list, the user interface is simply laid out and very easy to navigate.
The timeline at the bottom shows each of your clips or ‘scenes’ as they are called here, with the playback window above and an editing categories menu to the left.
This menu holds all the options you’ll need, from uploading your own video and audio assets to accessing InVideo’s vast array of stock video and images, music, and text options. As well as a multitude of templates to use as a starting point for your edit.
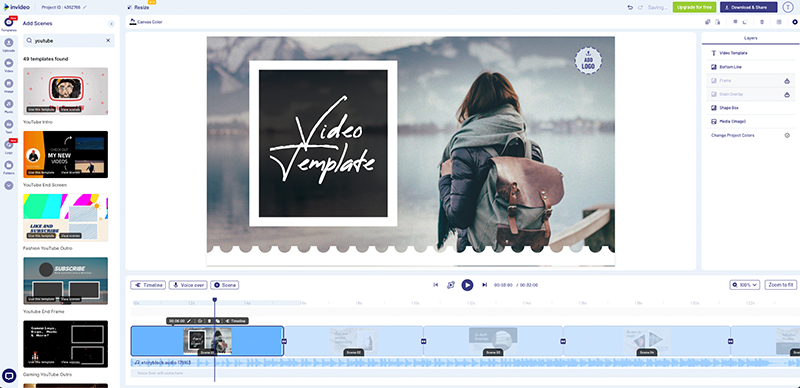
As you load elements into the scenes, various options to edit the scene contents appear on the right-hand menu, these include things like volume, clip trimming, blurring etc. All very easy to navigate and adjust.
The addition of the timeline view lets you more clearly view all of the elements in each scene, video audio, and graphics, and easily click on each to then edit the various options in the right-hand menu.
Though very easy to find your feet on your own, InVideo also comes equipped with 24hour live chat support, a series of very useful tutorials, and an active Facebook community you can always ask for help and advice.
- Email/helpdesk
- FAQs/Formus
- Phone support
- 24/7 live chat
- In depth tutorial section
Features:
InVideo comes packed with a whole host of useful features. One of our favorites was the remove image background feature, a great addition for stills that can isolate a subject so you can change the background behind them!
Though not flashy, a well-designed folders menu lets you create folders to group all your assets, very useful as you create more projects and want to reuse different elements multiple times.
Simply store them in a well-named folder and you’ll be able to quickly find them without having to scroll through all your past uploads.
A really great addition for YouTube content creators is the many end screen templates InVideo has available.

With some really eye-catching designs and animations, you can brand these with your own channel colors and add them to the end of a project to encourage viewers to subscribe and keep watching your channel.
Other features include…
- Live audio capture
- Collaboration tools
- Content library
- Well designed intro and outro templates
- Great stock library
- Social media integration
- Video stabilisation
- Great text options
Publishing:
After you have finished your video, you hit the download and share button and are taken to a screen where your video is ready to watch as a full HD render.
This process varies depending on the length of your video and the quality of your internet connection but the test projects we made, went very fast.

From this screen, you then have the option to download the video directly to your computer, or if you prefer you can share it directly to YouTube, Facebook, Twitter, and Instagram among others.
So either download or click the right button to share to the platform of your choice. Job done!
Pricing:
- Free – Videos export with a small invideo watermark
- $10/m USD – for a years subscription
- $20/mo USD – for a month to month plan
Room for improvement:
One great feature that InVideo has is a ‘voiceover’ track, separate from the music track for your project. What’s not made clear is this voiceover track can be used for other audio assets you upload like sound effects, not just voiceovers.
It would be good if this option were made not only clearer but also if users could use the inbuilt sound effects library on this track, that would be a game-changer! But unfortunately for now, only uploaded files can be dropped there.
Overall:
InVideo is one of, if not the best storyboard-style video editors out there.
It’s as easy as other programs to learn but offers access to your video on a slightly deeper level that making it that little bit easier to get truly creative with your edits.
When you couple that with the fact that you can get started using it and publishing videos for free from the platform, there’s no reason not to give it a try.
#2 FlexClip
FlexClip’s aim is to create straightforward tools that make professional video production accessible to everyone.
With their video editor, they’ve managed to do just that, creating a simple drag and drop system that lets you build great videos very easily.
They’ve created a user-focused platform where creators can effortlessly produce very high-quality work.
Ease of use:
Similar to InVideo and others on this list, FlexClip is a drag and drop ‘storyboard’ system with an uncluttered, easy-to-navigate user interface.
Clips are arranged side by side along the bottom, with a categories menu on the left and some refinement tools along the top.
The left-hand menu covers everything you should need access to, from templates through to the text, music, and animated elements. An impressive assortment of templates and stock media means you should have no trouble getting started.
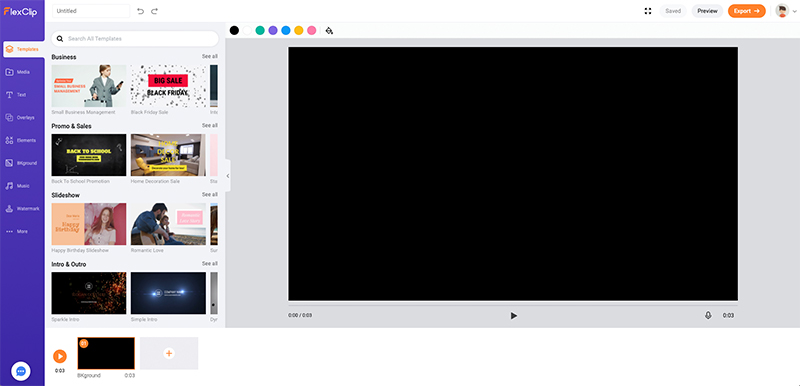
Once you’ve either uploaded your own media or selected the stock clips of your choosing, you simply drag the clip to the bottom timeline.
A pop-out lets you trim the clip to the correct length and then once you’re happy, you simply hit trim video and the portion you’ve selected will appear in the timeline.
FlexClip is one of the easiest editors to log on and start using, however, they do have a well-rounded step-by-step ‘getting started’ tutorial document that guides you through the whole process.
You’d also be wise to take a look at their learning center which has a number of video editing resources and articles to help improve your projects.
- Getting started guide
- Learning centre
- Help centre
- Contact form
It’s also worth noting that at the time of writing, FlexClip is in beta on a more expansive timeline editor option. Users will be able to choose between that and the storyboard editor option.
Features:
The video maker platform from FlexClip isn’t overstuffed with unnecessary features. In fact, the simple approach is probably its biggest strength.
It has everything you need and expect, clip trimming, music text, and voiceover recording. The most technical it gets is allowing you to adjust the brightness, contrast, or saturation of each clip.
Its free additional tools also help set it apart from the competition. A good online video compressor lets you shrink a video’s file size without loss of quality. An ideal tool for faster uploads and simpler storage.
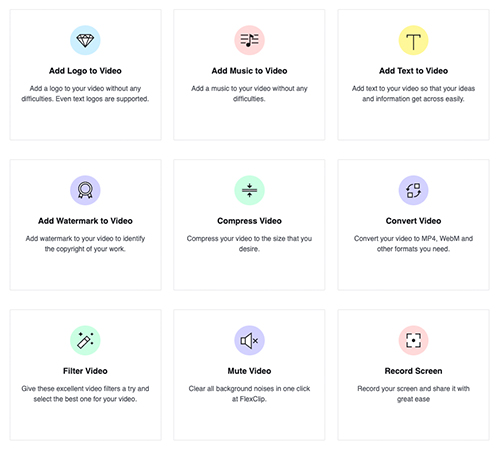
You can also convert any video to a number of different formats with just the click of a button.
Other great additions like the screen recorder let you record any active window on your computer through your browser. The free GIF maker and Make a Meme tools are also very useful for social posting.
Other features include…
- Add logo to video
- Add music to video
- Merge videos
- GIF maker
- Meme Maker
- Create a Gif from Photo
- Convert video to gif
Publishing:
When you’re ready, you hit the export button on the top right of the screen and are brought to a page that lets you choose what resolution to export in. (HD resolutions are only available in the paid plans) or gives you the option to export your project as a GIF.
Once you’ve selected your option, after a quick render, a download will start automatically. You are also given the opportunity to share it directly to your social channels through direct links to YouTube, Facebook, Twitter, and Instagram among others.
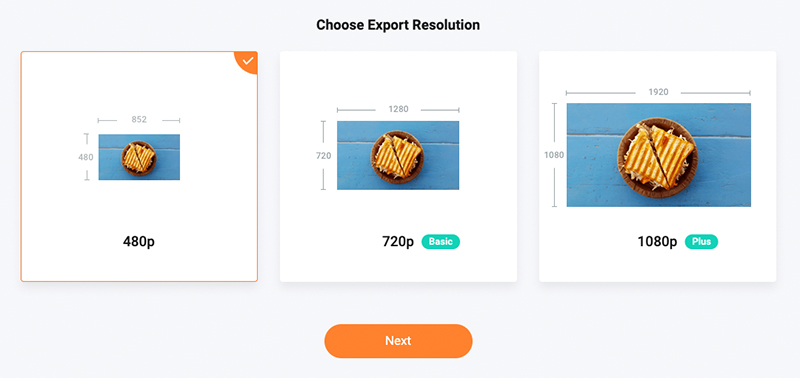
Pricing:
- Free – Limits on exports and the number of assets you can use but a good way to try out the editor.
- $4.99/mo USD – The Basic plan on a year subscription
- $7.99/mo USD – The Plus plan on a year subscription
Room for improvement:
FlexClip’s strength is that it’s very simple to use and navigate, with a no-frills approach to their video editor.
One of the things that we found a little frustrating was is you make changes to the style of graphics or background, the colors you have selected don’t translate to the next selection. To save some time, this seems like an easy fix!
Overall:
FlexClip is an excellent storyboard editor with a great array of stock options and some interesting extra features. The screen and webcam recorder were particularly useful.
With some good artistic options available, creators will be able to produce videos that entertain and engage their audiences.
#3 Wave.video
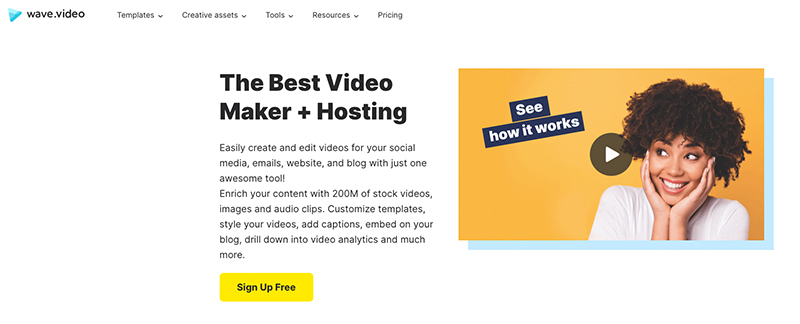
Wave.Video is actually a tool that lets you do much more than just edit your video.
By letting you post directly to your social media platforms and even host your videos on the platform itself, ready to embed in a website, for example, Wave.Video can become a hub for your content creation and distribution.
But lets talk about the video editor itself. Wave.Video has managed to create a very easy-to-navigate interface that’s simple to understand even for absolute beginners.
With template options for every social platform, the beginnings of a professional-looking video are only ever a click away.
Ease of use:
The interface for the program is extremely intuitive and easy to navigate. A simple menu on the left side of the screen lets you jump between broad categories like the size of the video, templates, stock footage, and the actual edit among others.
Any selections you make will translate into the edit tab onto a simple two-track ‘timeline’ layout below the video where you can see all your clips laid out in sequence with any music or voiceover audio you have recorded below.
Simply hit the big blue play button to play from the beginning of your video or the small play button above the current time marker in the timeline to play from that point in time.
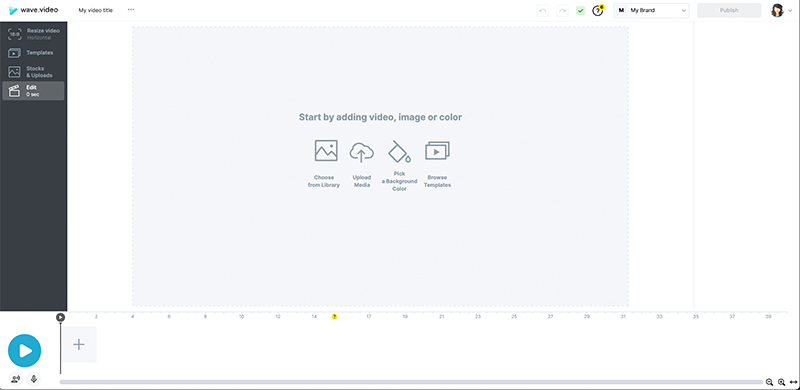
A particularly useful feature of Wave.Video is that graphics and templates automatically resize to fit different video styles, so a horizontal video you create for YouTube can quickly be changed to a vertical video for Instagram at the touch of a button.
Though the browser application is simple and intuitive, for anyone struggling with any specific issues, or need a quick introduction to the editor, Wave.Video has a free, short introduction academy as well as 24hour customer support.
- 24/7 customer support: web-widget, email, social media
- Free academy course: https://academy.wave.video/
- Knowledgebase: https://kb.wave.video/
- Video tutorials: https://wave.video/tutorial
Features:
There are a number of extremely useful features that come with Wave.Video but one of our favorites has to be its extensive video and image library, one of the biggest available in online video makers
Professionally shot b-roll can really set a video apart and with a selection as extensive as Wave.Video offers, you’ll be able to find footage that works as part of any project you need it to.
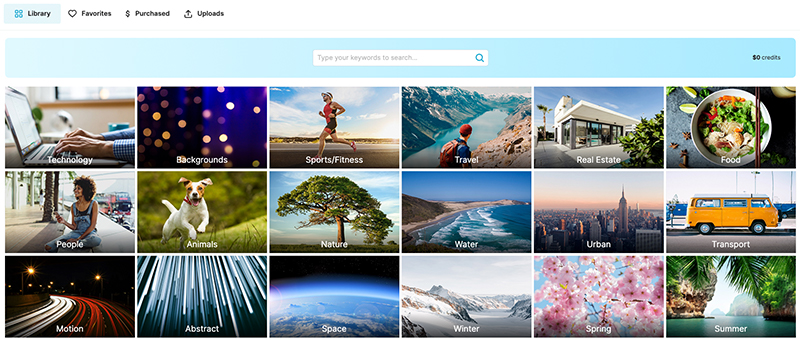
Another great addition to Wave.Video is its branding function. Save a preset of your brand colors, fonts, and logo, and then access and apply your settings to a project quickly and easily.
This means you don’t always need to be searching for the right colors for any graphics you add or scrolling through huge lists of fonts. The right branding is only a click away, saving you time better spent on recording and editing your videos.
Other great features include…
- Auto-captions with customizable styles
- Auto-resizing for 30+ video formats
- Multiple customizable video layouts
- Animated logo creation
- A huge royalty-free audio library
- Inbuilt voice-over tool
- Saving your branded style to ensure consistency
- Inspirational calendar to never run out of content ideas
- Folders to organize your work
Publishing:

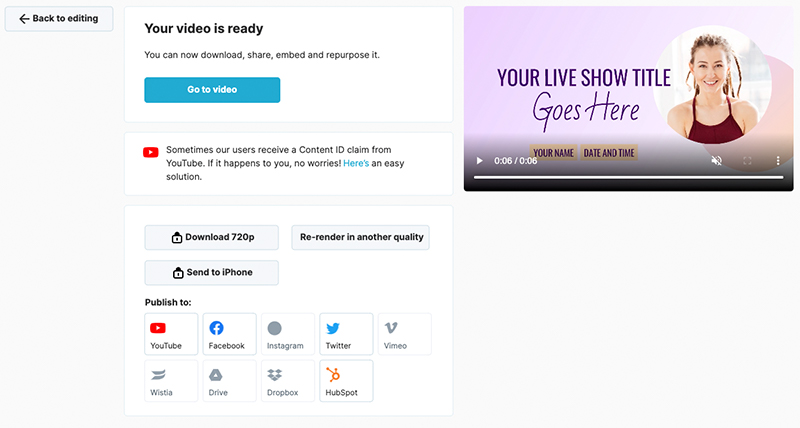
Once you’ve created your masterpiece, a quick click to render your project and you are able to share it directly to YouTube, Facebook, Twitter, and Instagram among others.
Or if you prefer, you can download your video directly to your computer to share and upload however you like.
The rendering process is very quick and provides you with a full quality render to watch before you move forward with sharing, so you can see exactly how your video will look and sound.
Then simply click the relevant button to share to the platform of your choice. Easy as that!
Pricing:
- Free – Limited access to clip library and 15second edit limit.
- $20/mo USD for a creator subscription
- $40/mo USD for a business subscription with added features.
Room for improvement:
The area that could use the most improvement in Wave.Video is the audio functions. Only one audio track means there’s no opportunity to add any sound effects or other audio.
Also, the volume levels can be a bit fiddly, with low-volume music tracks sometimes drowning out the full volume audio from your video clips.
Overall?
Wave.Video is an excellent choice for creators who want to quickly turn around high-quality edits on their browser with no need for an additional software program that’s very easy to learn.
The quality of clips it’s possible to create with this program is incredible and the ease of publishing through the site makes it a great one-stop creative shop.
A great place to start for video makers at the beginning of their creator journey.
#4 Wibbitz
Wibbitz is a simple storyboard generator but that might make it the perfect platform for beginners.
Its super pared-back interface and drag-and-drop functions make it incredibly easy to turn out high-quality video clips in no time at all!
Ease of use:
When you log in you’re invited to either create a video from scratch or use one of the many and varied templates available.
Once selected, this brings you to the main editing interface. Four sections are available on a menu down the left side of the browser window: Text, Media, Style, and Music. The first option you are prompted to is to enter text.
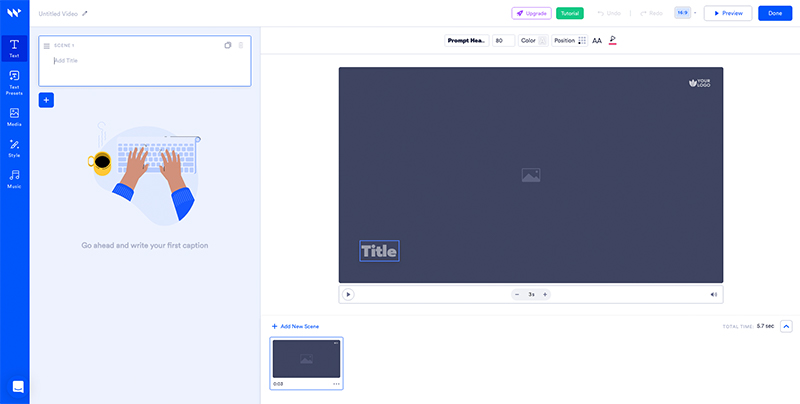
Here you can easily enter the words you want to appear on screen but also specify the number of scenes with the simple click of a button. Thumbnails for each of your new scenes appear below the playback window which takes up a big portion of the screen to the right.
When you’ve added in whatever text you want, the next step is to add media to your scenes. Wibbitz has a huge library of stock videos and images that should cover any of your needs. You’re also able to add your own clips by dropping them into the ‘My Media’ section of the media tab.
A small number of tools are available above the playback window to make changes to the clip in each scene. These include a crop and trim function, filters, and audio controls. These too are simple one-click options to achieve the desired result!
Support for Wibbitz is available through a chat popup at the bottom left of the browser. From here you can talk to a member of the team (if you’re on an upper tier plan) or search their vast array of articles or tutorial videos.
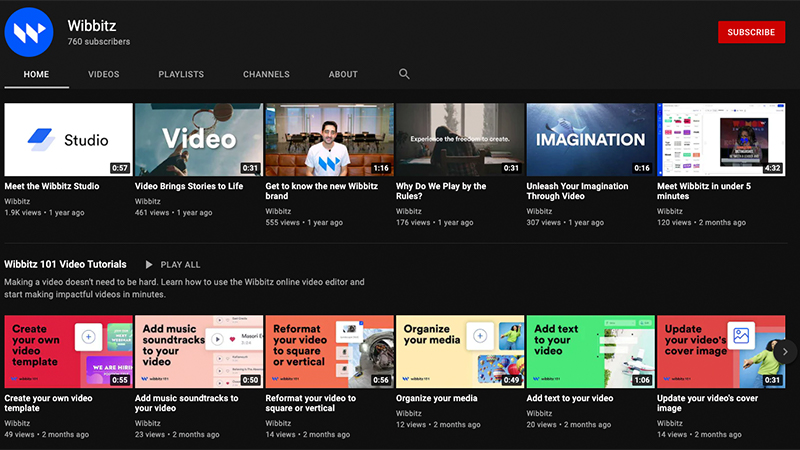
Their YouTube channel is also very well stocked, including playlists with all their video tutorials, plus Pro tips and some general interest and inspiring content!
Features:
For such a simple-to-use editor, Wibbitz has some great features to take your videos to the next level.
Their branding option is a great addition that allows you to set your own brand colors and upload both a corner logo and the main logo for your intros and outros.
The trim feature is a huge benefit that some other editors on this list don’t have. You can set the length of time you want your asset to display in the scene at the bottom of the playback window.

By hitting trim, you can then select the exact portion of the clip that you want to be shown, so you’re not stuck with whatever Wibbitz has defaulted for you. You can also select and easily control the clip and music volume with the handy audio slider above.
Another feature we really appreciated was in the media library. When you select a clip, either stock footage or your own uploads, a small preview window pops out so you can watch and listen to the clip before adding it to your project. Very useful!
Other great features include…
- Full HD downloads on all plans
- Photo and video library
- Premium soundtrack library
- Custom templates
- Filter tools
- Animated transitions
- Crop and move tool
Publishing:
At any time during the edit, you are able to preview the final video before finally hitting done and letting the video render. This takes you back to the home screen where you can see a progress thumbnail as the video renders.
Once your video has been rendered, you simply click the download button, from here you can save to the video your computer is ready to upload to the social channel of your choice or share a link for others in your team to preview and feedback on your work.

Pricing:
- $19/mo USD – The starter plan lets you export 5 watermarked videos per month
- $39/mo USD – The creator plan lets you export 10 videos a month and gives you access to their stock video library
- $119/mo USD – The Business plan lets you export 15 videos per month
The prices shown are monthly based on an annual subscription. Month-to-month prices are also available.
Room for improvement:
Wibbitz is an excellent platform for video creators looking to turn out high-quality videos in a short space of time. We really struggled to find areas to improve, but a small thing did stand out.
If you change video layout, say from landscape to square, the editor doesn’t readjust video or images to fit the new frame. This means if you want to make a video for Instagram then wish to change it to a vertical format for YouTube, a little work might be required to alter the framing of your scene contents.
Overall:
Wibbitz is a great system, no doubt about it. You can create something high quality, quickly and easily but are also given the freedom to tweak and make more detailed changes scene by scene as you need.
The only thing to be careful of is the amount of content you want to publish. Depending on the plan you choose, you might hit your video limit before the month is over.
#5 Vidnami

Vidnami is a simple scene-by-scene editor that is especially useful to creators coming to edit with little to no footage of their own. All you need is a script and Vidnami will create a high-quality video for you!
It’s also very simple and easy to navigate what is almost a step-by-step process. So it’s perfect for new creators!
Ease of use:
The first step in using Vidnami is to select a video template. They have a huge amount of choices, all divided into categories as well as different video formats, so you can find the right template for you and your platform of choice.
The next step is to upload a script. It’s a simple matter of copy-pasting the text into the script box and then hitting create a scene. What could be easier?!
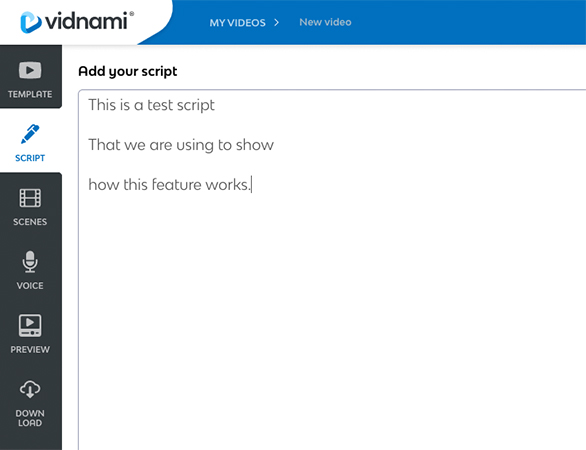
Vidnami then searches its library of stock video to find clips that best represent the lines in your script. Once it has, normally very quickly, it will separate your script into scenes and combine the text and video for you. All you need to do is scroll through to see the choices.
If you’re not happy with the clips they have auto-selected, there’s also an option to change it based on several related keyword searches on offer or by manually typing in your own keyword phrases. You also have the option to upload your own videos if you wish.
Next, you can add or record a voice track or use their auto voice feature. It’s also possible to have an option with no voice track, that plays music only.
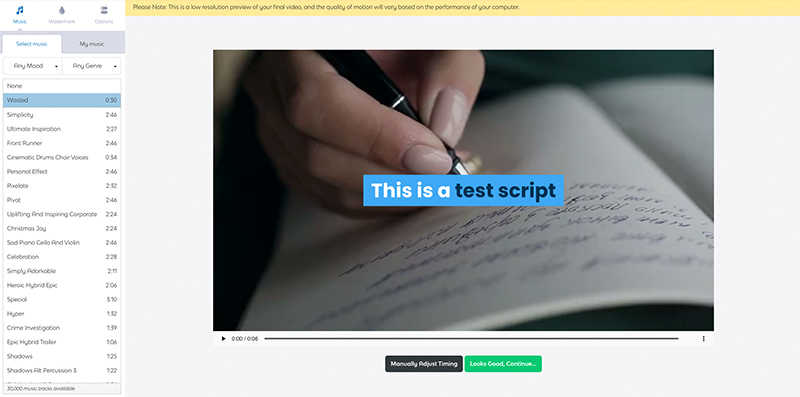
Then finally your video is ready to preview. You can choose or upload your own music as well as add your own watermark in this section.
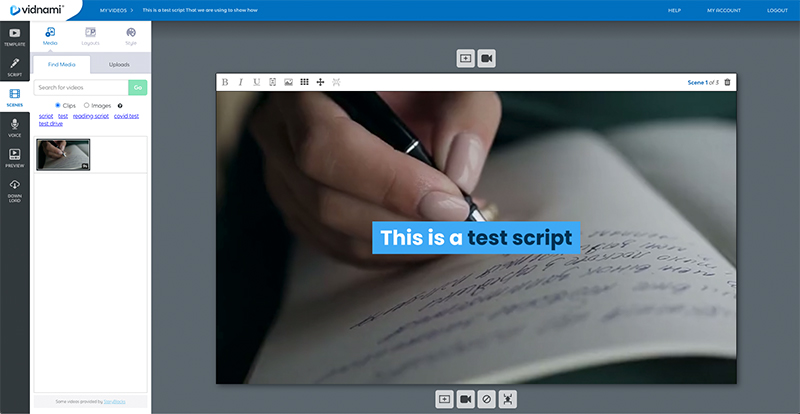
All that’s left to do is click continue and after a quick render your video is ready to download. The whole process is just a simple series of clicks, afterwards, you have a high-quality video ready to go!
Vidnami is such a simple step-by-step process that it’s very likely you’ll not run into any problems. But if you do, they have a good help section with training videos, general questions, and a link to their active Facebook group.
Features:
The main selling point of Vidnami is that it practically builds the video for you! However, it also comes with a few options for customizing your video along the way.
The script function is a very useful tool if you know what you want to say but aren’t sure how to go about saying it. And from there, it’s auto-generate scenes function is very impressive.
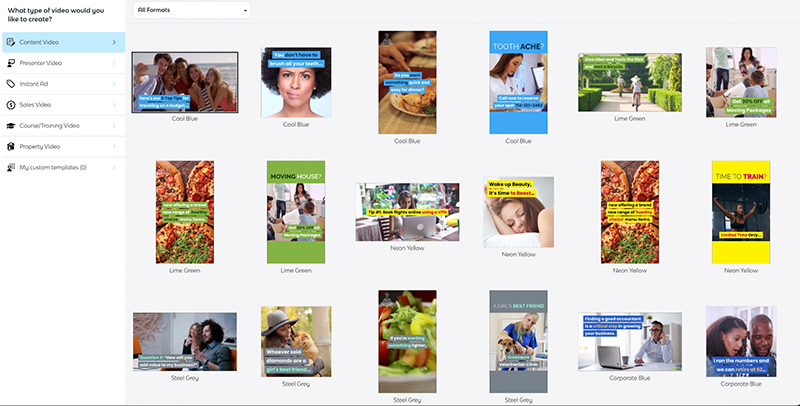
The sheer number of templates is also impressive, as is the variety of different formats of templates available. You’re covered whether no matter what social channel you want to create video for.
The categories are also pointed and a useful way of narrowing down the template that’s best for your project
Other great features include…
- Hundreds of thousands of stock video clips
- Over 100million stock images
- Premium music tracks
- Custom templates
- Custom branding.
Publishing:
At the bottom of the menu list and the final step in the quick creation process is the download button. Once clicked, Vidnami optimizes the audio and the scenes, encodes your video, and saves it to the Vidnami cloud.
All that’s left to do is click download and you’ll have a copy of your video ready to share to the social platform of your choice.
Pricing:
- Free – Try all functions but export with a watermark
- $47 USD – for a month-to-month plan
- $397 USD – for a full year subscription
Room for improvement:
Vidnami is a very good product. That you’re able to create a high-quality video in literally minutes is great. However, there were a couple of small issues we picked up on.
If you set your scene length to 5 seconds and select a clip that’s 10 seconds long, there doesn’t seem to be a way to trim which 5 seconds of the clip will play. For us, that’s a small tweak that would give creators a far greater feeling of control over their edit.
Final rendering and output can take a bit of time. Depending on the length of your project, you might be waiting a while for all the various parts to render. It’s not ridiculously long, but something to keep in mind if you ever need to turn around projects very quickly!
Overall:
Vidnami feels like a tool best suited to creators at the beginning of their journey or those less interested in hands-on video editing who are simply wanting to quickly create content that they can share.
The auto-generated outputs are very impressive though and we’re sure will be exactly what many of you are looking for!
Wrapping things up…
That wraps our rundown of the 10 best online video editors
No matter your video editing skill level, we are positive there will be an editor on this list that’s right for your needs.
Enjoy creating! Oh, and if you have any questions, comments, or have suggestions for other great online video editors, leave a comment below!


